Make a website- to throw away or keep?In this post i will be discussing the art of traffic filtering and how that relates to different types of websites that can be used by online marketers.
When marketing online and making money online there’s usually two kinds of websites that you’ll find. The big ones with loads of content which are usually a more generic kind of site than targeting a specific niche. One of the major considerations when choosing what kind of site to build is what niche are you targeting? If your targeting gambling online you can build a website and continually add more content to it but if your targeting a niche such as “UK payday loans” maybe it would be better to build a website with less opportunity for the website user to surf away from your site to sites that aren’t your advertisers!
It all comes down to traffic filtering. If your not up to date with this term I’m going to discuss it now. Traffic filtering is where you have a user surfing on your page and they are looking for something specific. We will take a niche such as gambling, this is a very open niche with plenty of room to loose the user, if you keep adding to the website you can have opportunities for the user leave to an advertiser that matches what they want. For example i will have links to sports betting, casino games, poker, slots all on one page but as the user moves from page to the next they are being filtered to match your advertiser. When a user clicks on sports betting they could brought to a list of sports betting websites, now maybe the user wants a large free bet when they open an account. Therefore when you list all the free bets listed beside each other the user now can choose which of your adverts to click thru.
So from just someone surfing a website looking for something gamble on we now know that they want to gamble on sports betting with a great free bet offer. This could be filtered further, showing different odds for horse racing or football then you will no exactly what the surfer wants.
So how does this relate to a build once and forget about website or build a site to continually update? A throw away site is best when its maybe one or two pages on a specific niche such as UK payday loans and your traffic has already been filtered down through a PPC campaign. But if your getting a lot of traffic from poor hard links you will need to have more pages are filter the traffic down. With a website you continually update, you can then introduce more content and build search engine oriented pages to get users.
Throw away site- best for niche specific traffic that has already been filtered
Continually update site- best for SEO targeted sites in a more generic niche.
30 Maret 2009
Free Web space
If you have no money at all it's always best to start your site on free web space, as this means no overheads and pure profits. If you site is popular you can move on to bigger things. If you have a little cash, and these days hosting really is pennies then it's well worth getting a domain and some proper hosting.
Free web hosting from CosmicWebspace.com
They have the best hosting you'll ever get for free, and they won't plaster your site with loads of adverts. Although you'll have to have something special to get an account!
Proper Hosting
If you want to do it properly then you need a hosting company that is flexible. If you have had experience with hosting companies before, you'll know how hard it can be when you need a Perl module added or a sever feature added or updated. Flexible hosting companies are hard to find, but they do exist. CosmicSiteHosting will give you the support and flexibility you need, plus all the added experience in having in house software developers. They don't just resell other peoples scripts, they make the scripts. Why? Because we are a part of the same company. Take a look at a quality hosting company that you won't be leaving in a hurry.
Web hosting from CosmicSiteHosting.com
Soure: CosmicSiteHosting.com
Start a Website
Step 1 : Design a webpage
This isn't as hard as it used to be these days as there are many programs that will do all the difficult work for you. Macromedia Dreamweaver is a recommended program for doing this, there are other more affordable programs available but we cannot guarantee how good they are. We don't recommend FrontPage as it generates some very messy, non standard HTML which often only works in IE and not other browsers.
Macromedia Website
Our web design guide will show you how to use HTML to design a page either in DreamWeaver or Raw HTML. Take the tour and give it a go.
Web design guide
Once you have your site designed and ready with all the content in place you may want to consider getting a template made professionally for you. This is the most cost effective way to get a great looking website without having to pay a web designer to do everything for you. If you don't take this option now, it's certainly worth looking at later. It's the way we've always done it and we save an absolute fortune. Programmers can code pages perfectly, we just can't get them looking great without the help from a designer. Take a look at the template design services from CosmicSiteDesign.com, they are affordable and very effective:-
Template web design
If you are going to open a picture archive then creating thumbnails is essential. Web Thumbnail will create thumbnails in linked HTML pages in no time. Do not trying doing this by yourself. You'll be there for hours!
Step 2 : Get webspace to put your page on
If you don't have any money then start your site on free webspace, as this means no overheads and pure profits. But be warned, as domain names and web hosting are so cheap these days you'll be hard pushed to sell products off a website that is hosted on free web space.
Free web hosting
Accounts are very limited, but you won't find any better.
Step 3 : Submit the site to the major search engines
These should include Alta vista, Yahoo, Excite, Google etc. The use of programs such as Web Position gold and Engenius will improve your search engine rankings. Don't forget, search engine traffic is the best you can get.
Click below to download
Web Position gold
Engenius
Submitting your site to the major search engines is best done manually. There are submission services available that will submit your site to all the minor engines.
Ineedhits submission services
Step 4 : Market, market, market!
Creating Cool Web Buttons With Photoshop
Another tutorial today, this time is to create some nice and effective web buttons in photoshop. This is easy and does add that extra edge to your pages.
 Our finished web button
Firstly open a new document in your adobe photoshop program. I am going to make my buttons 50 pixels in height and 120 pixels in width.
 Creating a new image in photoshop
With your blank canvas, create a new layer, hold a ctrl + alt + shift+ n to create a new layer using the keyboard shortcut.
Next thing to do is select the rounded rectangle tool. The shortcut for this tool is “u” so just hit the u key and make sure you have the rounded tool selected.
 Selecting the rounded rectangle tool
Now select a color you would like your buttons to be, I’m going to make mine red, now draw a rounded rectangle that should fill about 80% of the canvas area, try to keep it centered. Which should give you something to the following image.
 The base layer of red
The next thing to do is to rasterize the layer, this will turn the data layer in to an image layer.
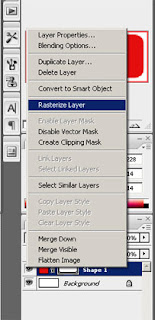 Rasterizing a layer
After your rasterize the image its time to load the selection for your button so we can create the effect. Now goto the select menu and click on load selection.
 Loading a selection with photoshop
With the selection load its time to get the area that we will add the glossy effect on, now select the marque tool and make sure its set on the rectangular tool with the subtract option picked, if your not sure on these options the image below shows the options you need to have selected.
 Choosing the marquee subtract tool
Now with this, select the lower half of the area selected from the load selection option. Now with this selected are you need to create a new layer (shift + ctrl + alt +n) and fill it with any color, it doesn’t matter what color as we are going to gradient overlay it. I chose white.
 The half selection that you fill
Now with this selection you need to setup a gradient overlay. This is pretty easy as we are just going to use default settings, give or take one. So click on the layer menu then click the layer style menu the click the gradient overlay option, You now need to select the color that you set your first layer as, mine was red so i chose red again, now click on the gradient drop down menu and click the first one. Mine looked like this.
 The gradiant menu in photoshop cs3
With this done my image now looks like this-
 The finished gradient
With this done, its time to give it a bit of definition, am going to use a str0ke for this, select the layer 1 and now go to the layer menu and layer style again but this time click on stroke. Change the size to 1px, position to outside and change the color to black! like this-
 Our stroke in photoshop
And that should be us! You can add some text over the top of the image with the text tool to make the buttons more meaningful but this is my finished product-
Our finished web button
Any questions or comments don’t be afraid to leave me comments!
Source: www.follor.com
 Our finished web button
Firstly open a new document in your adobe photoshop program. I am going to make my buttons 50 pixels in height and 120 pixels in width.
 Creating a new image in photoshop
With your blank canvas, create a new layer, hold a ctrl + alt + shift+ n to create a new layer using the keyboard shortcut.
Next thing to do is select the rounded rectangle tool. The shortcut for this tool is “u” so just hit the u key and make sure you have the rounded tool selected.
 Selecting the rounded rectangle tool
Now select a color you would like your buttons to be, I’m going to make mine red, now draw a rounded rectangle that should fill about 80% of the canvas area, try to keep it centered. Which should give you something to the following image.
 The base layer of red
The next thing to do is to rasterize the layer, this will turn the data layer in to an image layer.
 Rasterizing a layer
After your rasterize the image its time to load the selection for your button so we can create the effect. Now goto the select menu and click on load selection.
 Loading a selection with photoshop
 With the selection load its time to get the area that we will add the glossy effect on, now select the marque tool and make sure its set on the rectangular tool with the subtract option picked, if your not sure on these options the image below shows the options you need to have selected.
 Choosing the marquee subtract tool
Now with this, select the lower half of the area selected from the load selection option. Now with this selected are you need to create a new layer (shift + ctrl + alt +n) and fill it with any color, it doesn’t matter what color as we are going to gradient overlay it. I chose white.
 The half selection that you fill
 Now with this selection you need to setup a gradient overlay. This is pretty easy as we are just going to use default settings, give or take one. So click on the layer menu then click the layer style menu the click the gradient overlay option, You now need to select the color that you set your first layer as, mine was red so i chose red again, now click on the gradient drop down menu and click the first one. Mine looked like this.
 The gradiant menu in photoshop cs3
With this done my image now looks like this-
 The finished gradient
With this done, its time to give it a bit of definition, am going to use a str0ke for this, select the layer 1 and now go to the layer menu and layer style again but this time click on stroke. Change the size to 1px, position to outside and change the color to black! like this-
 Our stroke in photoshop
And that should be us! You can add some text over the top of the image with the text tool to make the buttons more meaningful but this is my finished product-
Our finished web buttonAny questions or comments don’t be afraid to leave me comments!
Source: www.follor.com
Making your site Great!
Javasript
Javascript allows a visitor to your webpage interact with it, to change it or for it to perform certain tasks. Javascript was used to create the rollover images already described.
When a visitor comes to your site a series of 'events' happen. An event is basically a message from your browser to indicate that a visitor has done something.
Lets use the rollover image as an example. When the visitor places their curser over the rollover image, the event (message) OnMouseOver is created by the browser. The browser then checks to see if it has any javascript that is supposed to be called when that event is generated.
Forms
These are used to gather information from visitors to your site. They consists of a number of fields which can be filled in by visitors and when submitted the information is sent to a cgi, php, asp, cfm or jsp script. These scripts process the information and can run a variety of server side tasks. There are many of these scripts available freely on the web, although for more powerful software such as affiliate software you can expect to pay a reasonable fee. View the section below on downloading such software.
Source: www.cosmicscript.com
Cascading Style Sheets (CSS)
Css stands for cascading style sheets. Css are a collection of formatting rules which control the layout and design of your webpage. Css allows you to have great control over the exact appearance of the webpage.
Css styles allow you to control your webpage much better than using HTML alone. You can set things such as bullet points in pixel sizes, ensuring greater consistency across the site whichever browser your visitor is using.Css is very useful when it comes to updating your webpage. You simply change the text style, colour etc once and it changes across all your pages, instead of having to go to each page and update it individually.To insert Css into a Dreamweaver application, go to Window => Css Style. In the top right of the screen, the Apply styles and Edit styles allow you to you select different views of the CSS styles associated with the current document. You use the Apply Styles to select a class style that you want to apply to the document. You then insert the document that you want to appear on the various pages. To do this, click the fourth button from the left at the bottom of the Css Styles panel and insert the location of the relevant document.Each css rule consists of two parts;
1. a selector that defines the HTML element(s) to which the rule applies, and
2. a collection of one or more properties, which describes the appearance of all elements in the document that match the selector.
h1 {
colour: red;
font-size:large;
}
The selector, h1, means that this rule applies to h1 headings in the document. (Headings are explained above.) All headings will be large and red.
You can select all paragraphs in the document to be included using the selector, p.
p {
font-size: 15 pixels;
colour: black
This means that all the font in the paragraph will be set at 15 pixels, and will all be green.
The commonest and most easy way to insert Css into your webpage is to have it embedded into the head of the document's HTML.
The css rules apply to all the designated parts of the webpage. Here, headings 1 (h1) and heading 2 (h2) are green and heading 3 (h3) is blue. This will be throughout the document, yet the HTML has had to be entered only once.
Source: www.cosmicscripts.com
Server side includes
Server side includes are pieces of information read by the web server before the page is loaded to the browser, which tell the browser to include a special file within the page. They allow you to write some commonly used code once and the server will insert in into your pages for you. This is especially useful for things like title of the page which should be generic across the whole website. It is also a good feature when updating the site as you change the design once and it appears changed across the site, instead of having to update numerous different pages with the same change.
To insert a server side include, go to Insert => Script Object => Server Side Include. Here a window appears and you can select the file that you want to be inculded on all of your pages.
For example, this footer would be a common usage of server side includes as it will appear on the bottom of all the pages of the site.
The raw html for a server side include is:
This needs to be inserted within the body tags of the html. Basically to include any file you need to place the file location between the tags
Source: www.cosmicscripts.com
Insert Frames
Frames allow you to have multiple pages on one webpage. This means that you have various different elements of the page in separate areas, all which are controlled individually, usually by scroll bars.This feature allows you to easily have the same piece of information on all your pages of your website (for example the links column) without having to construct it various times. It also is a lot quicker when updating the site as you only have to change it once and it has changed on all the pages.In Dreamweaver, to insert frames, click on the Frames tab at the top of the page. This produces various options of frame positioning. The most common is to have a frame on the left side of the page (first blue/white button) or to have two frames, one at the top, one on the left (tenth button). Click on the desired button and a new column appears on the page. Here you can enter the text/graphics that you want in the frame.
Source: www.cosmicscripts.com
Source: www.cosmicscripts.com
Inserting Links
It is essential to link all your different pages together, with just a few clicks. As we have said before, it should take a visitor no more than three clicks to find what they want or they will probably give up and leave.
You can create links to and from different pages, or to other parts of the same page.
For example, a common useful link is to have a 'back to the top' link, to take the user to the top of the page they are currently on. To create such a link, type 'Back to the Top' and highlight the words. In the properties window at the bottom of the page, there is a box labeled link. In this box write where the link wants to link to. (In this case the top of the page) This would be ......
Links can be created between all the different pages of the website. To do this select the text that will act as the link and type in the box labeled link the name of the page which you want your visitors to see.
For example if you want to link to your contact page, type the link (e.g. contact us) and highlight the text. In the link box in the properties window, type the name of your contact page (i.e. the name which you saved the contact page as.)
This is a link to our contact us page. The words contact us were typed, highlighted and the location of the contact us page (contact.htm) was typed in the link box.
When a the text becomes a link it is coloured blue and is underlined.
The html for the above contact link is as follows:-
contact us
This basically says that the file name is contact.htm and the text displayed on the page is contact us. To produce other links, simply replace the file name and the text with the relevant information.
For example, a link to the home page would look like this:-
home
You can also link from website to website. To do this simply type in the text that you want to appear on your website, highlight it and in the link box in text properties window, type the URL of the website that you wish to link to.
For example this is a link to CosmicScripts.com
The html for the above link is as follows:-
CosmicScripts
To change the site to which the link relates, simply change the URL to whichever you choose and change the text on the site accordingly.
For example to link to AllAffiliatePro, the html would be:-
AllAffiliatePro
Source: www.cosmicscripts.com
Inserting Images
Graphics enhance a webpage immensely. Without them the page looks boring, uninviting and your visitor is likely to leave. Luckily they are very simple to implement.
To add an image into your page using Dreamweaver, go to Insert => Image. A window will appear where you can select your image from your files. Select the image you want and click OK. The image will be inserted into your webpage wherever the cursor was at the time.
Clairebear
This image was inserted in that simple way. You can get images from almost anywhere (but remember to check for copywrite.) The internet is full of useful images available for use and with the use of a scanner, any real picture can be added to the site as well.The raw HTML of the image is:

Basically this is just the location of the image and its height and width. Simple!
Rollover Images
A common useful image is a rollover image. This is an image which changes in the browser when the curser is held over it. It consists of a primary image (the image seen when the page initially loads) and the secondary image (the image when the curser is over it). The two images need to be of the same size, although Dreamweaver will resize them if they are not.
To create a rollover image in Dreamweaver, Click on the Common option of the Insert window and click on the rollover image button (tenth from left). Click the curser where you want the rollover button to be and a window will appear. Insert an image name, the location of the primary image and the location of the secondary image. If the rollover image is also a link to another part of the site, add in the url as well. Click OK and your rollover image will have been created.
The rollover image uses two javascript functions which must be inserted inside the head tags at the top of the page .The functions below are provided by Macromedia. With these inserted you can have as many rollover images using the special a and img tags below.
This is the raw html for the rollover image above:

As you can see the raw html for rollovers is much more complicated than inserting them using a design package like Dreamweaver.
Source: www.cosmicscripts.com
To add an image into your page using Dreamweaver, go to Insert => Image. A window will appear where you can select your image from your files. Select the image you want and click OK. The image will be inserted into your webpage wherever the cursor was at the time.
Clairebear
This image was inserted in that simple way. You can get images from almost anywhere (but remember to check for copywrite.) The internet is full of useful images available for use and with the use of a scanner, any real picture can be added to the site as well.The raw HTML of the image is:
Basically this is just the location of the image and its height and width. Simple!
Rollover Images
A common useful image is a rollover image. This is an image which changes in the browser when the curser is held over it. It consists of a primary image (the image seen when the page initially loads) and the secondary image (the image when the curser is over it). The two images need to be of the same size, although Dreamweaver will resize them if they are not.
To create a rollover image in Dreamweaver, Click on the Common option of the Insert window and click on the rollover image button (tenth from left). Click the curser where you want the rollover button to be and a window will appear. Insert an image name, the location of the primary image and the location of the secondary image. If the rollover image is also a link to another part of the site, add in the url as well. Click OK and your rollover image will have been created.
The rollover image uses two javascript functions which must be inserted inside the head tags at the top of the page .The functions below are provided by Macromedia. With these inserted you can have as many rollover images using the special a and img tags below.
This is the raw html for the rollover image above:
As you can see the raw html for rollovers is much more complicated than inserting them using a design package like Dreamweaver.
Source: www.cosmicscripts.com
Head Content
A title for each page of the website needs to be entered so that search engines know what each page contains. The title is not displayed on the webpage. The title is entered by adding the required title between two title tags:
Webmaster Tools
Meta Tags
These are tags that contain information about the page which is used by web browsers and search engines. Words that relate to the page's content that you think that people will be searching should be entered. This helps to get ranked highly by the search engines. The meta tags for this page are:
Insert your own keywords that you think people will be searching for to look for your site. Tip: targeting less popular words and phrases will actually increase your
traffic. Microsoft do a program called Good Keywords. Download the software at :
http://www.goodkeywords.com
Insert a short description of your webpage. Tip: include as many keywords as reasonably possible.
This is another description of your website. Do not repeat what is said in the META NAME= "description" as the search engines do not favor this. Still try to include keywords.
This tells some search engines to follow the links on your page and index them into their search database.
Insert your own name or your company name. This is especially useful if you are a web designer so that people can see who made the site and perhaps pay you to design their site.
Here you can define the content of your site whether it is for viewing internationally, family orientated or adult. Options are:-
Global - Appropriate for web access.
Local - Web servers will not service a "local" document to the web.
IU - Internal use - Intranets.
This tells search engine spiders when to come back and re-index your page. Insert any time period you wish.
This tells the search engine what category to place your website into, depending on its content. Insert your own category. The options are limitless.
This tells people who has rights over the page. Insert your mane or the company name.
This is the ASCII character set and the content type. This should match the output of your server. Running the W3C html validator will tell you if you have input the correct character set.
This is the language your site is in. Such as EN for English.
Css Link
A Css link loads a file which contains the cascading styles for your site. This allows you to design the style for your site once. You can then add this at the top of each page. A Css link is very useful when updating your site as you only have to do it once and the whole site is updated. It is often used for font styles and link styles. To enter a Css link enter:
JavaScript Link
A javascript link is similar to a Css link and has the same advantages, you can update this and the whole site gets updated. To enter a javascript link enter:
Source: www.cosmicscripts.com
Insert Tables
Without tables in your website, the text would run from margin to margin. A table allows you to put text wherever you like on your page. Tables are a very good way of displaying your information as they are easily modified and are compatible with most browsers. In Dreamweaver, to insert a table, click on Insert => Table and the Insert Table window will appear. You can select how many columns and rows you want. Select the width you want and choose whether the value is pixels or percentage. It is often a good idea to use percentage as no matter what size the browser window, the visitor will always be able to see all the information present. Set the border to however thick you would like it, by entering number (1 is the thinnest border). Click OK and the table like the one below will appear in your document. You can align the table either using the central, left or right align scroll bar at the bottom of the page in the properties tool bar, or by using the mouse.
If you are using raw html enter the following code to get the same table:
Tables can easily be modified once they are already in place.
In Dreamweaver:
To add in a new column, select one of the existing columns. Click on Modify => Table => Insert Column and click OK. The table now has an extra column. The same can be done to add a row (Click on Insert Row rather than Insert Column.)
To merge cells, select the cells you want to merge. Click on Modify => Table => Merge Cells. Click OK and the cells will merge. The same can be done to split a cell (Click on Split Cell instead of Merge Cells.)
You can change the width and height of the cells by moving the mouse over the border line you wish to change. The cursor will change to a border selector (Two parallel lines with outward pointing arrows.) Click and hold down the mouse button and drag the cursor to where you want the row or column resized to.
Colour can be added to the table. Highlight the cell(s) which you wish to colour. Click on the square to the right of the background colour (Bg Color) so that you can see the options. Click on the colour you want and it will appear in the selected cell(s).
A border colour can be added to the table. Highlight the whole table. Select a border colour (Border Color) by clicking on the square to thru right of the writing and selecting a colour.
Source: www.cosmicscripts.com
Creating a Basic Page
Tags are html instructions that code for something. They are enclosed by < > and must always be opened and closed. A closing tag has a backslash infront of the instruction.
Anything between the two tags means that is is included in the table.
Basic Tag Set
If you are using Dreamweaver, when you select a new document, the basic tags automatically appear.
This tells the Internet what sort of page you have created and is needed for any page that is on the net. The title of the webpage is entered between the tags . The title will not appear on the site, but search engines use it to rank your site.
The content of the webpage is added between the and tags. (This is where the page is automatically entered if you are using dreamweaver.)
Background
The background colour is usually kept the same between each page of the website. To enter the background colour using Dreamweaver:
Go to Modify => Page Properties. This brings up the page properties window. In this window you can select a background colour by clicking on the square next to the word background. This brings up a square grid of colours you can choose from. Alternatively, you can click on the coloured circle just above these colours and choose a colour from the graduated selection. Click OK to apply this colour to your page.
If using raw html, add a background colour by inserting bgcolour= the required colour code within the body tag.
Source: www.cosmicscripts.com
Insert a Text
Search engines rank a site on the content of the heading of a paragraph, rather than a body of text. Each section of your page should have a heading tag, and the main text a paragraph.
In Dreamweaver, to achieve a heading tag, highlight the text of the heading. Click the Format option in the Properties window (it is a good idea to keep the properties window expanded so that all options are exposed). Scroll to heading 1 and click. The same process applies for subsequent headings, with ascending numbers. Headings are always of default size.
To obtain paragraph tags, click the format option in the Properties window and scroll to paragraph and click.
This is heading 1
The heading has the tags
This is heading 2
The heading has the tags
This is heading 3
Heading 3 is surrounded by the tags
This is heading 4
Heading 4 is surrounded by the tags
This is heading 5
Heading 5 is surrounded by the tags
Please note that all headings are in default size. They get progressively smaller in size as they progress. The reason for this is that heading 1 is more important to your search engine rank than heading 5.
This is a paragraph. It is surrounded by the tags
Fonts
You can format your web page text however you like. There are numerous pre-installed fonts and others can be downloaded from the net.
To change the font, highlight it, click on the scroll bar next to the yellow A in the Properties window. Choose the font you want. To change the size, highlight the text and click on the Size in the Properties tool bar. Select whatever size you want.
Below, the tags found in the html surround the look and size of the font that they code for.
This is Arial, size 1.
This is Verdana, size 2.
This is Times New Roman, size 3.
This is Courier New, size 4.
This is Georgia, size 5.
This is Geneva, size none.
Please note that size none does not have any size reference in the html code at all.
To add colour to the text, highlight the text. Click on the square to the left of the size scroll bar. A range of colours will appear. Click on the desired colour and your text will become that colour.
This text is Verdana, size 2 and is blue
Source: www.cosmicscripts.com
In Dreamweaver, to achieve a heading tag, highlight the text of the heading. Click the Format option in the Properties window (it is a good idea to keep the properties window expanded so that all options are exposed). Scroll to heading 1 and click. The same process applies for subsequent headings, with ascending numbers. Headings are always of default size.
To obtain paragraph tags, click the format option in the Properties window and scroll to paragraph and click.
This is heading 1
The heading has the tags
surrounding it.
This is heading 2
The heading has the tags
surrounding it.
This is heading 3
Heading 3 is surrounded by the tags
This is heading 4
Heading 4 is surrounded by the tags
This is heading 5
Heading 5 is surrounded by the tags
Please note that all headings are in default size. They get progressively smaller in size as they progress. The reason for this is that heading 1 is more important to your search engine rank than heading 5.
This is a paragraph. It is surrounded by the tags
.
Fonts
You can format your web page text however you like. There are numerous pre-installed fonts and others can be downloaded from the net.
To change the font, highlight it, click on the scroll bar next to the yellow A in the Properties window. Choose the font you want. To change the size, highlight the text and click on the Size in the Properties tool bar. Select whatever size you want.
Below, the tags found in the html surround the look and size of the font that they code for.
This is Arial, size 1.
This is Verdana, size 2.
This is Times New Roman, size 3.
This is Courier New, size 4.
This is Georgia, size 5.
This is Geneva, size none.
Please note that size none does not have any size reference in the html code at all.
To add colour to the text, highlight the text. Click on the square to the left of the size scroll bar. A range of colours will appear. Click on the desired colour and your text will become that colour.
This text is Verdana, size 2 and is blue
Source: www.cosmicscripts.com
29 Maret 2009
CARA INTERNET MURAH PAKE HANDPHONE
Koneksi internet menggunakan handphone dan nomer gsm M3 bisa murah banget. Bahkan ga sampe 3000/jamnya. Percaya? Caranya sangat sederhana banget. Bangat-banget sederhana deh pokoknya. Ga perlu setting apa-apa. Tinggal colok kabel data ke handphone dan hubungkan ke laptop atau komputer di kamar kamu. Nah mau ga cating di kamar sama gebetan baru atau cari gebetan dengan chating semalaman lewat mirc atau yahoo masengger?
buka berita di detik.com juga bisa banget dan murah. Ngeblok? Atau jadi Bloger Ngepet untuk dapetin puluhan Dolar? Bisa dari dalam kamar doang sambil tiduran tanpa harus kehilangan banyak pulsa. Bisa sambil ngopi atau sambil bugil, kalau mau atau udaranya panas. Tapi di pastikan ga bakalan bisa lihat gambar porno apalai nonton film porno. Kalau mau lihat seh bisa! Tapi siap-siap saja jadi miskin karena melihat gambar porno ternyata muuuahal harganya. Hahhaha…setingan ini hanya untuk yang tidak suka film porno. Jika niatan anda berinternet untuk gambar porno, sebaiknya nggak usah dilanjutin baca artikel ini. Deal? Deal!
Caranya:
Cari handphone yang bisa koneksi ke laptop. Siemens C 55 kayaknya yang paling murah. Aku pake K610i –Hihihi- itu hadiah dari salah satu pembaca novelku. Jadi kayaknya seh mahal, padahal itu gratis. Makasih ya buta yang ngasih K610i-nya. Kalau nggak punya HP, beli deh Siemens apa ajah. Jenis siemens ini ternyata yang paling mudah cari kabel datanya. Paling murah seh 40.000,- untuk kabel datanya. Siemens minta royalti dunk! Kan udah aku reverensiin neh HP-nya.
Beli nomer M3, aktikan GPRS-nya. Indosat minta duit dunk, udah pada ganti nomer M3 neh untuk internetan.
Donwload Indosat Accelerator Client V03. Klik DISINI untuk download.
Setelah DOWNLOAD, instal deh. Klik di settup. Langsung dan mudah tanpa masukin kode apapun. Restart komputer kamu!
Jika sudah di instal dan di restart tuh komputer, maka akan ada gambar kotak kecilberlogo indosat di komputer kamu. Biasanya di pojok bagian kanan. Deketnya sgambar sound untuk volume. Kalau nggak dia langsung muncul sebagai shourcut di layat monitor kamu. Tulisanya Indosat Accelerator Client V03.
Klik 2 kali logonya indosat yang tadi. Muncul satu halaman deh! Trus naikin ajah pake kursor ke tulisan Highest. Atau sampai muncul No Image. kalau kamu pingin bayar lebih mahal pilih ajah keterangan yang lain. Untuk bisa murah, Highes pilihan tepat.
Klo udah gambar itu bisa muncul, berarti instalan sukses. Kalau belum bisa berarti gagal. Tapi di jamin bisa kok! Setelah yakin udah pasti pilihan higgest, konect deh ke internet pake hape kamu sendiri dan nomer M3 yang tadi udah kamu setting GPRS-nya.
Kalau udah Conect internet, jangan buka apa-apa dulu. Ini penting! Jangan membuka mozila atau apapaun. Pokoknya nggak boleh.
Cek sekali lagi. Dan lihat gambar Indosat Accelerator Client V03. Pastikan kamu pilih Highest ya. Kalau udah klik Aply dan Start. Lalu silahkan browshing sesukanya. Silahkan cathing sesukanya.
kalau mau lihat Image, klik lagi Indosat Accelerator Client V03. Turunin dari higgest ke Lowest. Tapi sebaiknya jangan dilakukan karena ini biayanya mahal. 1 jam bisa Rp. 6.000,-
Kalau Cuma chating di MIRC biaya bisa ga sampe 1.000,- semalaman.
Yaho masangger sama G-mail atau MSN silahkan setting preferencenya. Hilangkan yang ga penting kayak voice apa video atau gambar-gambar yang lain.
Selamat mencoba. Kalau ragu, silahkan pinjam Handphone dan nomer m3 temen dulu. Kalau terbukti berhasil, baru beli kabel data dan handphone Siemens dan nomer M3 baru.
Sumber: www.endik.seniman.web.id.
Indosat Accelerator Client V03! Hanya untuk indosat.
CARA MEMBUAT BLOG DI BLOGGER.COM
Berhubung banyak teman teman yang minta di ajarkan untuk membuat blog maka aku mencoba untuk membagi ilmu ku yang sedikit ini ke teman teman. Mudah mudahan bermanfaat. Mohon maaf kalau masih banyak kekurangan karena aku pun masih pemula.
1. Membuat Account
Kunjungi situs www.Blogger.com
Untuk mulai membuat account, klik tombol “Creat Your Blog Now”
Selanjutnya kita akan masuk ke halaman berikut nya yaitu “Create Account”.
Isi semua kolom yang diminta.
Setelah selesai, lanjutkan dengan tombol “Continue”
Jangan lupa untuk check list tanda kolom “Acceptance of Terms”
Ok deh ,…langkah pertama selesai sudah.
2.Membuat Nama
Selanjutnya masuk ke langkah kedua yaitu “ Name Your Blog”
Masukkan judul Blog kita pada kolom “Blog title”
Title blog ini akan menjadi nama blog kita, masukkan alamat blog kita pada kolom “Blog address” maka akan menjadi alamat blog kita.
seperti contoh aku nulis bonysst diblog ku maka akan menjadi;
http://www.bonysst.blogspot.com
3. Memilih Template
Klik “Choose a template”
Pilih template sesuai dengan keinginan kita lalu klik tombol “Continue”
Kalau sudah selesai, maka akan tampil halaman konfirmasi “Your Blog has been created”
Untuk langkah selanjutnya adalah mulai untuk memasukkan tulisan kita ke dalam Blog ( biasanya disebut) posting. Usahakan untuk langsung posting pada saat pertama kali berhasil membuat Blog.
Intinya sih.....dengan banyak praktek dan praktek ternyata kita akan lebih banyak tahu, dan tidak serumit yang di bayangkan.
Selamat Mencoba.
Have a nice try
Apa yang Dimaksud dengan Blog?
Blog merupakan singkatan dari “web log” adalah bentuk aplikasi web yang menyerupai tulisan-tulisan (yang dimuat sebagai posting) pada sebuah halaman web umum. Tulisan-tulisan ini seringkali dimuat dalam urut terbalik (isi terbaru dahulu baru kemudian diikuti isi yang lebih lama), meskipun tidak selamanya demikian. Situs web seperti ini biasanya dapat diakses oleh semua pengguna internet sesuai dengan topik dan tujuan dari si pengguna blog tersebut.
Sejarah
Media blog pertama kali dipopulerkan oleh Blogger.com, yang dimiliki oleh PyraLab sebelum akhirnya PyraLab diakuisi oleh Google.Com pada akhir tahun 2002 yang lalu. Semenjak itu, banyak terdapat aplikasi-aplikasi yang bersifat sumber terbuka yang diperuntukkan kepada perkembangan para penulis blog tersebut.
Blog mempunyai fungsi yang sangat beragam, dari sebuah catatan harian, media publikasi dalam sebuah kampanye politik, sampai dengan program-program media dan perusahaan-perusahaan. Sebagian blog dipelihara oleh seorang penulis tunggal, sementara sebagian lainnya oleh beberapa penulis. Banyak juga weblog yang memiliki fasilitas interaksi dengan para pengunjungnya, yang dapat memperkenankan para pengunjungnya untuk meninggalkan komentar atas isi dari tulisan yang dipublikasikan, namun demikian ada juga yang yang sebaliknya atau yang bersifat non-interaktif.
Situs-situs web yang saling berkaitan berkat weblog, atau secara total merupakan kumpulan weblog sering disebut sebagai blogosphere. Bilamana sebuah kumpulan gelombang aktivitas, informasi dan opini yang sangat besar berulang kali muncul untuk beberapa subyek atau sangat kontroversial terjadi dalam blogosphere, maka hal itu sering disebut sebagai blogstorm atau badai blog.
Komunitas Blogger
Komunitas blogger adalah sebuah ikatan yang terbentuk dari para blogger berdasarkan kesamaan-kesamaan tertentu, seperti kesamaan asal daerah, kesamaan kampus, kesamaan hobi, dan sebagainya. Para blogger yang tergabung dalam komunitas-komunitas blogger tersebut biasanya sering mengadakan kegiatan-kegiatan bersama-sama seperti kopi darat.
Untuk bisa bergabung di komunitas blogger, biasanya ada semacam syarat atau aturan yang harus dipenuhi untuk bisa masuk di komunitas tersebut, misalkan berasal dari daerah tertentu.
Beberapa jenis komunitas blogger adalah Komunitas Blogger Daerah, yaitu Komunitas Blogger berdasarkan kedaerahan atau wilayah tertentu, Komunitas Blogger Non-Daerah, yang biasanya terbentuk karena kesamaan hobi atau yang lainnya, dan Komunitas Blogger Kampus.
Jenis-jenis blog
Blog politik: Tentang berita, politik, aktivis, dan semua persoalan berbasis blog (Seperti kampanye).
Blog pribadi: Disebut juga buku harian online yang berisikan tentang pengalaman keseharian seseorang, keluhan, puisi atau syair, gagasan jahat, dan perbincangan teman.
Blog bertopik: Blog yang membahas tentang sesuatu, dan fokus pada bahasan tertentu
Blog kesehatan: Lebih spesifik tentang kesehatan. Blog kesehatan kebanyakan berisi tentang keluhan pasien, berita kesehatan terbaru, keterangan-ketarangan tentang kesehatan, dll.
Blog sastra: Lebih dikenal sebagai litblog (Literary blog).
Blog perjalanan: Fokus pada bahasan cerita perjalanan yang menceritakan keterangan-keterangan tentang perjalanan/traveling.
Blog riset: Persoalan tentang akademis seperti berita riset terbaru.
Blog hukum: Persoalan tentang hukum atau urusan hukum; disebut juga dengan blawgs (Blog Laws).
Blog media: Berfokus pada bahasan kebohongan atau ketidakkonsistensi media massa; biasanya hanya untuk koran atau jaringan televisi
Blog agama: Membahas tentang agama
Blog pendidikan: Biasanya ditulis oleh pelajar atau guru.
Blog kebersamaan: Topik lebih spesifik ditulis oleh kelompok tertentu.
Blog petunjuk (directory): Berisi ratusan link halaman website.
Blog bisnis: Digunakan oleh pegawai atau wirausahawan untuk kegiatan promosi bisnis mereka
Blog pengejawantahan: Fokus tentang objek diluar manusia; seperti anjing
Blog pengganggu (spam): Digunakan untuk promosi bisnis affiliate; juga dikenal sebagai splogs (Spam Blog)
Budaya populer
Ngeblog (istilah bahasa Indonesia untuk blogging) harus dilakukan hampir setiap waktu untuk mengetahui eksistensi dari pemilik blog. Juga untuk mengetahui sejauh mana blog dirawat (mengganti template) atau menambah artikel. Sekarang ada lebih 10 juta blog yang bisa ditemukan di Internet. Dan masih bisa berkembang lagi, karena saat ini ada banyak sekali software, tool, dan aplikasi Internet lain yang mempermudah para blogger (sebutan pemilik blog) untuk merawat blognya. Beberapa blogger kini bahkan telah menjadikan blognya sebagai sumber pemasukan utama. Sehingga kemudian muncullah istilah profesional blogger, atau problogger, orang yang menggantungkan hidupnya hanya dari aktivitas ngeblog.
Resiko kejahatan
Karena blog sering digunakan untuk menulis aktivitas sehari-hari yang terjadi pada penulisnya, ataupun merefleksikan pandangan-pandangan penulisnya tentang berbagai macam topik yang terjadi dan untuk berbagi informasi - blog menjadi sumber informasi bagi para hacker, pencuri identitas, mata-mata, dan lain sebagainya. Banyak berkas-berkas rahasia dan penulisan isu sensitif ditemukan dalam blog-blog. Hal ini berakibat dipecatnya seseorang dari pekerjaannya, diblokir aksesnya, didenda, dan bahkan ditangkap.
Tips dan Trik Membuat Situs
Saat akan membuat situs terkadang kita bingung mau mulai dari mana, untuk itu ada beberapa hal yang perlu disiapkan, setelah itu baru beraksi.
* Rancang apa yang akan ditampilkan
Yang perlu diperhatikan bahwa situs harus singkat, informasinya jelas dan lengkap, karena itu tentukan tampilan yang luwes baik isi maupun foto. Jangan terlalu banyak menampilkan foto, pilih foto yang benar-benar menunjang situs.
Pilih warna yang cemerlang kalau perlu tampilkan warna bercahaya namun gunakan warna yang baik karena sistem komputer diciptakan tidak semuanya sama. Industri hardware komputer sangatlah pesat perkembangannya. Misalnya saja pada industri hardware VGA card. VGA card saat ini sudah sangat canggih dan semuanya menjanjikan untuk dapat menampilkan warna-warna yang cemerlang di komputer Anda.
Di dunia web dikenal istilah safe web color adalah warna-warna yang sekiranya jika ditampilkan di beberapa sistem komputer hasilnya akan sama dan baik. Safe web color saat ini biasanya memanfaatkan 256 color, meski beberapa saat lagi 256 color ini bisa dikatakan sudah kuno.
* Kata kunci (keyword/frase)
Keyword adalah kata kunci yang penting agar pengunjung mudah mencari situs kita karena tidak semua orang tahu domain kita. Nah, kata kunci tersebut yang bisa membawa ke situs kita, sebaiknya tempatkan kata kunci di dalam judul, nama file, dan isi situs.
* Mempersiapkan domain name.
Domain adalah alamat situs kita, misalnya www…com, atau www….co.id, Kita dapat mendaftarkan domain ke jasa register domain baik yang international maupun lokal.
* Penempatan situs (hosting)
Setelah situs siap, perlu melakukan pemasangan situs agar dapat diakses. Banyak tempat atau web server di internet yang dapat menjadi lokasi penempatan situs untuk file-file tersebut. Ada yang berupa fasilitas gratis, namun ada pula yang berbayar dengan kontrak waktu tertentu.
Salah satu fasilitas gratis dengan layanan yang lengkap dapat ditemukan di http://geocities.yahoo.com. Selain tersedia alat bantu untuk upload yang sangat membantu pengguna awam, kapasitas harddisk yang diberikan untuk setiap website adalah 15 Megabyte. Ukuran yang cukup besar untuk sebuah website permulaan.
Bagi pengguna yang belum pernah membuat website sebelumnya, Geocities menyediakan alat bantu pembuatan website yang diberi nama "Yahoo! PageWizards". Dengan adanya tools tersebut, Anda dapat mengatur desain dan tata letak web secara instan.
Untuk menggunakannya, Anda harus login terlebih dahulu. Namun jika belum mempunyai account Yahoo!, lakukan sign up untuk layanan Geocities Free Web hosting. Setelah berhasil masuk, klik menu "Yahoo! PageWizards" dan lakukan empat langkah untuk mengatur tampilan situs yang diinginkan.
Empat proses tersebut meliputi pengisian judul web dan informasi yang akan ditampilkan, memasukkan gambar, menambahkan menu, dan menampilkan informasi pemilik beserta e-mailnya. Dengan visualisasi yang jelas untuk setiap langkahnya, proses pembuatan website dengan alat bantu tersebut akan menjadi lebih mudah.
* Gunakan navigasi juga dengan text, jangan cuma grafis
Banyak kasus di mana seorang web designer membuat menu bar atau elemen navigasi web dengan menggunakan gambar. Penulis sarankan selain menggunakan gambar grafis, sediakan juga elemen navigasi yang berbasis teks biasa.
Ini penting karena terkadang yang mengakses situs Anda mungkin memiliki akses internet yang lambat. Navigasi berbasis teks juga bagus untuk browser berbasis teks, misalnya Lynx dan lain sebagainya.
Faktor lainnya adalah seringkali orang mematikan fitur gambar pada web browser sehingga gambar-gambarnya tidak bisa terlihat. Jika situs Anda semuanya berbasis grafis, navigasi Anda tidak akan terlihat.
Thanks to: dhony navandi
Langkah-langkah Membuat Homepage
Bermacam-macam langkah yang digunakan profesi web kita untuk membuat suatu homepage. Berikut ini adalah proses secara umum yang dilakukan kebanyakan profesi web di Indonesia untuk membuat web.
Membuat Sketsa Desain : Desainer bisa saja menuangkan ide dalam membuat interface suatu homepage dalam bentuk sketsa di kertas dahulu. Untuk kebanyakan orang, biasanya langkah ini dilewatkan dan langsung pada langkah membuat layout desain dengan menggunakan software.
Membuat Layout Desain : Setelah sketsa sudah jadi, kita menggunakan software seperti Adobe Photoshop, Adobe Illustrator, Macromedia Fireworks dan Macromedia Freehand untuk memperhalus sketsa desain.
Membagi gambar menjadi potongan kecil-kecil : Setelah layout desain homepage sudah jadi. File gambarb tersebut dipecah menjadi potongan kecil-kecil untuk mengoptimize waktu download. Untuk melakukan hal tersebut dapat menggunakan software Adobe Image Ready. Software ini dapat langsung memotong gambar yang besar tadi dan otomatis juga menjadikannya ke dalam format html. Langkah ini bisa saja dilewatkan bila ukuran gambar kita tidak terlalu besar.
Membuat Animasi : Animasi diperlukan untuk menghidupkan homepage kita agar menarik pengunjung. Macromedia Flash dan Gif Construction Set dapat dipakai untuk melakukan hal tersebut.
Membuat HTML : Setelah itu kita merapikan layout desain kita seperti menempatkan beberapa tombol dan gambar, menambah text, mengedit script HTML, membuat layout form ke dalam format HTML. Untuk itu kita perlu software HTML Editor seperti Macromedia Dreamweaver, Microsoft Frontpage dan Allaire Homesite.
Programming dan Script : Untuk website e-commerce, iklan baris, lelang, database, membuat guestbook, counter dan forum diskusi. File HTML kita perlu programming untuk melakukan aktivitas semacam itu. Programming dan script ini bisa dibuat dengan menggunakan ASP, Borland Delphy, CGI, PHP, Visual Basic. Dan perlu diperhatikan bahwa programming dan script ini biasanya dilakukan setelah desain homepage kita telah jadi.
Upload HTML : Setelah file kita telah menjadi html beserta gambar dan scriptnya. Kita perlu meng-upload file kita ke suatu tempat ( hosting ), agar semua orang di dunia dapat mengakses halaman html kita. Biasanya Macromedia Dreamweaver dengan fasilitas site FTP dan Microsoft Frontpage dengan Publishnya telah menyediakan fasilitas upload ini. Atau dapat menggunakan software seperti WS-FTP, Cute FTP, Bullet FTP.
Homepage Pribadi : Untuk homepage pribadi atau yang sekedar ingin coba-coba biasanya setelah file html sudah jadi dapat hosting di tempat-tempat gratis, memakai guestbook dan counter gratis dan menambah macam-macam accesories dalam mempercantik homepage pribadi tersebut.
sumber : rizky.semarangindah.com
Tips dan Trik Membuat Website
Dalam membuat karya apapun seorang designer mempunyai kesadaran untuk tidak meniru atau menggunakan karya orang lain. Begitu pula seorang Web Designer harus mempunyai budaya malu untuk menggunakan icon, animasi, button, dll, yang telah digunakan atau dibuat oleh orang lain.
Komposisi : Seorang Web Designer selalu memperhatikan komposisi warna yang akan digunakan dalam website yang dibuatnya. Pergunakan selalu Palette 216 WebColor, yang dapat diperoleh dari Adobe.com, hal ini untuk mencegah terjadinya dither pada image yang berformat GIF. Dalam membangun website suatu perusahaan, Web Designer selalu menyesuaikan warna yang digunakan dengan Corporate Color perusahaan tersebut. Sebagai contoh: Telkom Corporate Color-nya adalah biru, Coca-Cola : merah dan putih, Standard-Chartered : hijau dan biru, dsb. Untuk kemudian warna-warna tadi digunakan sebagai warna dominan atau sebagai elemen pendukung (garis, background, button, dsb).
Simple : Web Designer banyak yang menggunakan prinsip “Keep it Simple”, hal ini ditujukan agar tampilan website tersebut terlihat rapi, bersih dan juga informatif.
Semiotik : Semiotika adalah ilmu yang mempelajari tentang tanda-tanda. Dalam hal ini diharapkan dengan melihat tanda atau gambar, user/ audience dapat dengan mudah dan cepat mengerti. Sebagai contoh: Jangan membuat gambar/image yang berkesan tombol, padahal itu bukan tombol/ link.
Ergonomis : Web Designer selalu memperhatikan aspek ergonomi. Ergonomi disini adalah dalam hal kenyamanan user dalam membaca dan kecepatan user dalam menelusuri website tersebut. Web Designer memilih ukuran Fonts yang tepat sehingga mudah dibaca, Web Designer menempatkan link sedemikian rupa sehingga mudah dan cepat untuk di akses dan lebih penting lagi adalah Informatif.
Fokus : Tentukan hirarki prioritas dari pesan yang akan disampaikan, misalnya: Judul harus besar, tetapi jangan sampai akhirnya akan konflik dengan subjudul yang berukuran hampir sama. Hal ini akan membingungkan user/audience untuk menentukan pesan mana yang harus lebih dahulu dibaca/ dilihat.
Konsisten : Tentukan font apa yang akan digunakan sebagai Body-text, Judul, Sub Judul dan sebagainya, sehingga website tersebut akan terlihat disiplin dan rapi. Sesuaikan jenis huruf yang digunakan dengan misi dan visi website tersebut, misalnya: hindari menggunakan font Comic dalam membangun website suatu perusahaan resmi.
Demikian beberapa aspek dan prinsip yang digunakan Web Designer dalam membuat website, selebihnya merupakan ekspresi dari pembuat website itu sendiri yang terwujud dalam penggayaan penyusunan website.
Software-software Pembuat Website
Desain : Untuk membuat desain suatu homepage biasanya para web designer dimulai dengan software ini sebagai tampilan sementara atau dalam membuat layout homepage.
Adobe Photoshop : Desain berbasis titik ( bitmap )
Adobe Image Ready : Memotong gambar-gambar ke dalam format html
Adobe Illustrator : Desain berbasis vector
CorelDraw : Desain berbasis vector
Macromedia Freehand : Desain berbasis vector
Efek Desain : Hal ini dilakukan untuk menghidupkan desain yang telah kita rancang. Seperti menambah efek cahaya, textur dan manipulasi teks.
Macromedia Firework : Efek teks
Painter : Memberikan efek lukisan
Ulead Photo Impact : Efek frame dan merancangan icon yang cantik.
Plugins Photoshop : Seperti Andromeda, Alien Skin, Eye Candy, Kai’s Power Tool dan Xenofex juga sangat mendukung untuk memberi efek desain sewaktu anda mendesain layout homepage di Photoshop.
Animasi : Penambahan animasi perlu untuk membuat homepage agar kelihatan menarik dan hidup.
3D Studio Max : Untuk membuat objek dan animasi 3D.
Gif Construction Set : Membuat animasi file gif
Macromedia Flash : Menampilkan animasi berbasis vector yang berukuran kecil.
Microsoft Gif Animator : Membuat animasi file gif
Swift 3D : Merancang animasi 3D dengan format file FLASH.
Swish : Membuat berbagai macam efek text dengan format file FLASH.
Ulead Cool 3D : Membuat animasi efek text 3D.
Web Editor : Menyatukan keseluruhan gambar dan tata letak desain, animasi, mengisi halaman web dengan teks dan sedikit bahasa script.
Alaire Homesite
Cold Fusion
Microsoft Frontpage
Macromedia Dreamweaver
Net Object Fusion
Programming : Hal ini dilakukan setelah sebagian besar desain homepage telah rampung. Programming bertugas sebagai akses database, form isian dan membuat web lebih interaktif.
Contoh : Membuat guestbook, Form isian, Forum, Chatting, Portal, Lelang dan Iklanbaris.
ASP ( Active Server Page )
Borland Delphy
CGI ( Common Gateway Interface )
PHP
Perl
Upload : File html kita perlu di letakkan ( upload ) di suatu tempat ( hosting ) agar orang di seluruh dunia dapat melihat homepage kita.
Bullet FTP
Cute FTP
WS-FTP
Macromedia Dreamweaver : dengan fasilitas Site FTP
Microsoft Frontpage : dengan fasilitas Publish
Sound Editor : Homepage kita belum hidup tanpa musik. Untuk mengedit file midi atau wav, perlu alat khusus untuk itu.
Sound Forge : Mengedit dan menambah efek file yang berformat mp3 dan wav.
Cakewalk : Mengedit dan menambah efek untuk file yang berformat midi
Banyak sekali memang software untuk membuat suatu homepage dan kita tidak perlu mempelajari semua software tersebut di atas. Tapi untuk mempermudah, bagi pemula lebih baik dimulai terlebih dulu dengan mempelajari software Microsoft Frontpage atau Macromedia Dreamweaver agar lebih mengenal aturan-aturan membuat homepage dan mengenal bahasa html.
18 Maret 2009
Tips Cara Mengcopy Bookmark Favorit ke PC Lainnya.
Anda memiliki koleksi website favorit dalam bookmark? Bagaimana jika Anda ingin melihat koleksi website tersebut di PC lain? Tenang saja. Internet Explorer 7.0 memiliki fungsi "Import and Export" untuk meng-copy bookmark ke dalam media penyimpanan lainnya. Jalankan fungsi ini dari menu "File" Internet Explorer. Dalam Wizard, Anda pilih "Export Favorites". Klik "Next" lalu tentukan folder bookmark yang ingin di-copy dan media penyimpanannya, seperti flash disk atau hard disk eksternal. Setelah selesai, Anda klik "Finish". Kini, Anda tinggal menjalankan file hasil output-nya pada PC lainnya dengan Internet Explorer 7.0.
Langganan:
Postingan (Atom)