- Kalau anda punya account email di Yahoo, anda secara otomatis punya account juga di GeoCities. Bila anda sudah punya account di Yahoo, langsung aja isi Yahoo ID dan Password anda dalam form yang telah ada di halaman utama GeoCities, selanjutnya klik Sign in. Bila anda belum punya account email di Yahoo, klik aja Sign Up untuk mendaftar di GeoCities, pilih yang free saja. Anda secara otomatis punya account email juga di Yahoo. Selanjutnya anda akan menuju halaman GeoCities selanjutnya buat pendaftaran account di GeoCities.
- Isi form form yang ada dalam halaman pendaftaran account di GeoCities. First name, Last name, dan data data lainnya. Pilih Yahoo ID anda, pastikan Yahoo ID anda belum ada yang memiliki sebelumnya dengan menge-klik Check Availability of This ID. Bila sudah ada yang memiliki Yahoo ID yang sama, maka mau tak mau anda harus cari Yahoo ID lain untuk account anda di GeoCities. Kalo gak mau susah, pilih aja ID yang jumlah karakternya banyak, yakin deh account anda belum ada yang punya. Oh ya, akan ada form juga untuk ngisi alamat email alternatif anda. Alamat email alternatif ini digunakan untuk mengirimkan email buat aktivasi account anda. Lanjutkan ke langkah selanjutnya bila form anda telah terisi lengkap dan Yahoo ID yang anda pilih belum ada yang punya. Jangan lupakan satu hal penting selain nama account anda, password anda !
- Bila anda berhasil, akan ada pesan Registration Completed. Anda telah mendapat Yahoo ID sekaligus account di GeoCities sesuai dengan yang anda pilih. Account email anda di Yahoo : account_anda@yahoo.com. Untuk login ke Yahoo atau ke GeoCities, anda tinggal masukkan account anda ke dalam form user name, dan password anda dalam form password. Klik Continue to Yahoo GeoCities untuk berlanjut ke langkah selanjutnya.
- Anda akan memasuki halaman website seperti di bawah ini. Ada beberapa pertanyaan yang harus anda jawab. Pilih sesuai yang anda pikirkan, dan lanjutkan ke tahap seterusnya.
- Ada kata sambutan dari GeoCities buat anda, dan ada informasi mengenai account anda, berupa informasi Yahoo ID anda dan URL website anda nantinya. Web anda bisa diakses melalui URL http://www.geocities.com/account_anda. Klik Build your website now! untuk melanjutkan oprekan anda.
- Nah, siapkan diri anda buat ngupload file file yang anda buat. Ada beberapa menu yang ada, pilih manage.
- Pilih File Manager.
- Klik Open File Manager.
- Anda telah masuk halaman utama hosting web anda. Tampak ada 1 file bernama index.htm, sebagai default. Anda bisa mengganti file ini dengan halaman index yang telah anda buat. Tampak ada beberapa tab dalam halaman ini. Klik New untuk membuat file baru, Edit untuk mengubah file, Copy untuk mengcopy, Rename untuk memberi nama baru, dan Delete untuk menghapus file. Jangan lupa untuk memberi check list bila anda ingin mengeksekusi file anda. Klik Upload Files untuk mengupload file file yang ada di komputer anda.
- Klik browse untuk mencari letak file file anda.
- Cari letak file file anda, untuk contoh saya pilih file index.html. Setelah ketemu klik Open. Ulangi langkah ini untuk mencari file file lainnya.
- Bila semua file sudah tercantum dalam daftar file di bawah, klik Upload Files. Klik Add more files bila daftar file telah penuh.
- Bila berhasil, akan ada pesan Upload successfully. Kegagalan upload file biasanya karena ekstensi atau nama file anda bermasalah, ataupun ukuran file anda yang terlalu besar. Klik Upload More Files untuk upload file baru atau klik File Manager untuk masuk halaman utama.
- Kalau anda klik File Manager, anda akan temukan daftar file yang telah anda upload. Tampak dalam gambar, ada tambahan file index.html dalam daftar file anda.
- Anda dapat menambah direktori baru dengan mengklik tab New di bawah tulisan Subdirectories.
- Masukkan nama direktori baru anda, dan klik Create Subdirectory. Saya contohkan namanya images.
- Akan ada pesan Successfully created images bila berhasil membuat direktori baru. Direktori images akan ada dalam daftar file anda.
- Klik direktori images bila anda ingin menambahkan file baru dalam direktori images anda. Cara upload ke direktori ini tidak berbeda dengan cara sebelumnya. Klik Upload Files, trus browse file, dan seterusnya.
- Yah, begitulah secara garis besar langkah langkah untuk hosting file anda dalam GeoCities. Jangan lupa untuk Sign out bila semua file sudah anda upload ke GeoCities.
- Setelah Sign out, akan ada pesan You have signed out of the Yahoo! Network. Bila masih ada beberapa file yang ingin anda upload lagi, klik Return to Yahoo! GeoCities. Mudah kan ?
Tampilkan postingan dengan label Tips Website. Tampilkan semua postingan
Tampilkan postingan dengan label Tips Website. Tampilkan semua postingan
12 Mei 2009
Web Hosting Gratisan By GeoCities
Setelah anda selesai mengerjakan website pribadi anda dalam komputer, anda pasti perlu tempat buat naruh website buatan anda dalam sebuah tempat sehingga website anda bisa dinikmati oleh banyak orang di seluruh penjuru dunia. Nah, tempat itu dapat kita sebut web hosting. Banyak sekali penyedia web hosting yang ada di sekitar kita, yang harus mbayar ataupun yang free. Search aja di Google buat nyari penyedia web hosting gratisan. Yakin deh, banyak penyedia web hosting gratisan yang akan muncul di layar search engine anda, baik yang support PHP & MySQL ataupun yang hanya support HTML saja. Penyedia jasa free web hosting yang cukup terkenal saat ini adalah GeoCities. Sayangnya GeoCities ini tidak support PHP & MySQL, sehingga untuk membuat sebuah web yang interaktif akan sulit sekali bila kita memakai GeoCities. Kali ini saya akan sedikit membahas tentang GeoCities ini, cukup lah buat latihan awal ngoprek web hosting gratisan :)

30 Maret 2009
Creating Cool Web Buttons With Photoshop
Another tutorial today, this time is to create some nice and effective web buttons in photoshop. This is easy and does add that extra edge to your pages.
 Our finished web button
Firstly open a new document in your adobe photoshop program. I am going to make my buttons 50 pixels in height and 120 pixels in width.
 Creating a new image in photoshop
With your blank canvas, create a new layer, hold a ctrl + alt + shift+ n to create a new layer using the keyboard shortcut.
Next thing to do is select the rounded rectangle tool. The shortcut for this tool is “u” so just hit the u key and make sure you have the rounded tool selected.
 Selecting the rounded rectangle tool
Now select a color you would like your buttons to be, I’m going to make mine red, now draw a rounded rectangle that should fill about 80% of the canvas area, try to keep it centered. Which should give you something to the following image.
 The base layer of red
The next thing to do is to rasterize the layer, this will turn the data layer in to an image layer.
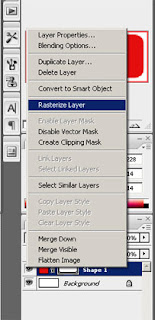 Rasterizing a layer
After your rasterize the image its time to load the selection for your button so we can create the effect. Now goto the select menu and click on load selection.
 Loading a selection with photoshop
With the selection load its time to get the area that we will add the glossy effect on, now select the marque tool and make sure its set on the rectangular tool with the subtract option picked, if your not sure on these options the image below shows the options you need to have selected.
 Choosing the marquee subtract tool
Now with this, select the lower half of the area selected from the load selection option. Now with this selected are you need to create a new layer (shift + ctrl + alt +n) and fill it with any color, it doesn’t matter what color as we are going to gradient overlay it. I chose white.
 The half selection that you fill
Now with this selection you need to setup a gradient overlay. This is pretty easy as we are just going to use default settings, give or take one. So click on the layer menu then click the layer style menu the click the gradient overlay option, You now need to select the color that you set your first layer as, mine was red so i chose red again, now click on the gradient drop down menu and click the first one. Mine looked like this.
 The gradiant menu in photoshop cs3
With this done my image now looks like this-
 The finished gradient
With this done, its time to give it a bit of definition, am going to use a str0ke for this, select the layer 1 and now go to the layer menu and layer style again but this time click on stroke. Change the size to 1px, position to outside and change the color to black! like this-
 Our stroke in photoshop
And that should be us! You can add some text over the top of the image with the text tool to make the buttons more meaningful but this is my finished product-
Our finished web button
Any questions or comments don’t be afraid to leave me comments!
Source: www.follor.com
 Our finished web button
Firstly open a new document in your adobe photoshop program. I am going to make my buttons 50 pixels in height and 120 pixels in width.
 Creating a new image in photoshop
With your blank canvas, create a new layer, hold a ctrl + alt + shift+ n to create a new layer using the keyboard shortcut.
Next thing to do is select the rounded rectangle tool. The shortcut for this tool is “u” so just hit the u key and make sure you have the rounded tool selected.
 Selecting the rounded rectangle tool
Now select a color you would like your buttons to be, I’m going to make mine red, now draw a rounded rectangle that should fill about 80% of the canvas area, try to keep it centered. Which should give you something to the following image.
 The base layer of red
The next thing to do is to rasterize the layer, this will turn the data layer in to an image layer.
 Rasterizing a layer
After your rasterize the image its time to load the selection for your button so we can create the effect. Now goto the select menu and click on load selection.
 Loading a selection with photoshop
 With the selection load its time to get the area that we will add the glossy effect on, now select the marque tool and make sure its set on the rectangular tool with the subtract option picked, if your not sure on these options the image below shows the options you need to have selected.
 Choosing the marquee subtract tool
Now with this, select the lower half of the area selected from the load selection option. Now with this selected are you need to create a new layer (shift + ctrl + alt +n) and fill it with any color, it doesn’t matter what color as we are going to gradient overlay it. I chose white.
 The half selection that you fill
 Now with this selection you need to setup a gradient overlay. This is pretty easy as we are just going to use default settings, give or take one. So click on the layer menu then click the layer style menu the click the gradient overlay option, You now need to select the color that you set your first layer as, mine was red so i chose red again, now click on the gradient drop down menu and click the first one. Mine looked like this.
 The gradiant menu in photoshop cs3
With this done my image now looks like this-
 The finished gradient
With this done, its time to give it a bit of definition, am going to use a str0ke for this, select the layer 1 and now go to the layer menu and layer style again but this time click on stroke. Change the size to 1px, position to outside and change the color to black! like this-
 Our stroke in photoshop
And that should be us! You can add some text over the top of the image with the text tool to make the buttons more meaningful but this is my finished product-
Our finished web buttonAny questions or comments don’t be afraid to leave me comments!
Source: www.follor.com
Making your site Great!
Javasript
Javascript allows a visitor to your webpage interact with it, to change it or for it to perform certain tasks. Javascript was used to create the rollover images already described.
When a visitor comes to your site a series of 'events' happen. An event is basically a message from your browser to indicate that a visitor has done something.
Lets use the rollover image as an example. When the visitor places their curser over the rollover image, the event (message) OnMouseOver is created by the browser. The browser then checks to see if it has any javascript that is supposed to be called when that event is generated.
Forms
These are used to gather information from visitors to your site. They consists of a number of fields which can be filled in by visitors and when submitted the information is sent to a cgi, php, asp, cfm or jsp script. These scripts process the information and can run a variety of server side tasks. There are many of these scripts available freely on the web, although for more powerful software such as affiliate software you can expect to pay a reasonable fee. View the section below on downloading such software.
Source: www.cosmicscript.com
Javascript allows a visitor to your webpage interact with it, to change it or for it to perform certain tasks. Javascript was used to create the rollover images already described.
When a visitor comes to your site a series of 'events' happen. An event is basically a message from your browser to indicate that a visitor has done something.
Lets use the rollover image as an example. When the visitor places their curser over the rollover image, the event (message) OnMouseOver is created by the browser. The browser then checks to see if it has any javascript that is supposed to be called when that event is generated.
Forms
These are used to gather information from visitors to your site. They consists of a number of fields which can be filled in by visitors and when submitted the information is sent to a cgi, php, asp, cfm or jsp script. These scripts process the information and can run a variety of server side tasks. There are many of these scripts available freely on the web, although for more powerful software such as affiliate software you can expect to pay a reasonable fee. View the section below on downloading such software.
Source: www.cosmicscript.com
Cascading Style Sheets (CSS)
Css stands for cascading style sheets. Css are a collection of formatting rules which control the layout and design of your webpage. Css allows you to have great control over the exact appearance of the webpage.
Css styles allow you to control your webpage much better than using HTML alone. You can set things such as bullet points in pixel sizes, ensuring greater consistency across the site whichever browser your visitor is using.Css is very useful when it comes to updating your webpage. You simply change the text style, colour etc once and it changes across all your pages, instead of having to go to each page and update it individually.To insert Css into a Dreamweaver application, go to Window => Css Style. In the top right of the screen, the Apply styles and Edit styles allow you to you select different views of the CSS styles associated with the current document. You use the Apply Styles to select a class style that you want to apply to the document. You then insert the document that you want to appear on the various pages. To do this, click the fourth button from the left at the bottom of the Css Styles panel and insert the location of the relevant document.Each css rule consists of two parts;
1. a selector that defines the HTML element(s) to which the rule applies, and
2. a collection of one or more properties, which describes the appearance of all elements in the document that match the selector.
h1 {
colour: red;
font-size:large;
}
The selector, h1, means that this rule applies to h1 headings in the document. (Headings are explained above.) All headings will be large and red.
You can select all paragraphs in the document to be included using the selector, p.
p {
font-size: 15 pixels;
colour: black
This means that all the font in the paragraph will be set at 15 pixels, and will all be green.
The commonest and most easy way to insert Css into your webpage is to have it embedded into the head of the document's HTML.
The css rules apply to all the designated parts of the webpage. Here, headings 1 (h1) and heading 2 (h2) are green and heading 3 (h3) is blue. This will be throughout the document, yet the HTML has had to be entered only once.
Source: www.cosmicscripts.com
Css styles allow you to control your webpage much better than using HTML alone. You can set things such as bullet points in pixel sizes, ensuring greater consistency across the site whichever browser your visitor is using.Css is very useful when it comes to updating your webpage. You simply change the text style, colour etc once and it changes across all your pages, instead of having to go to each page and update it individually.To insert Css into a Dreamweaver application, go to Window => Css Style. In the top right of the screen, the Apply styles and Edit styles allow you to you select different views of the CSS styles associated with the current document. You use the Apply Styles to select a class style that you want to apply to the document. You then insert the document that you want to appear on the various pages. To do this, click the fourth button from the left at the bottom of the Css Styles panel and insert the location of the relevant document.Each css rule consists of two parts;
1. a selector that defines the HTML element(s) to which the rule applies, and
2. a collection of one or more properties, which describes the appearance of all elements in the document that match the selector.
h1 {
colour: red;
font-size:large;
}
The selector, h1, means that this rule applies to h1 headings in the document. (Headings are explained above.) All headings will be large and red.
You can select all paragraphs in the document to be included using the selector, p.
p {
font-size: 15 pixels;
colour: black
This means that all the font in the paragraph will be set at 15 pixels, and will all be green.
The commonest and most easy way to insert Css into your webpage is to have it embedded into the head of the document's HTML.
The css rules apply to all the designated parts of the webpage. Here, headings 1 (h1) and heading 2 (h2) are green and heading 3 (h3) is blue. This will be throughout the document, yet the HTML has had to be entered only once.
Source: www.cosmicscripts.com
Server side includes
Server side includes are pieces of information read by the web server before the page is loaded to the browser, which tell the browser to include a special file within the page. They allow you to write some commonly used code once and the server will insert in into your pages for you. This is especially useful for things like title of the page which should be generic across the whole website. It is also a good feature when updating the site as you change the design once and it appears changed across the site, instead of having to update numerous different pages with the same change.
To insert a server side include, go to Insert => Script Object => Server Side Include. Here a window appears and you can select the file that you want to be inculded on all of your pages.
For example, this footer would be a common usage of server side includes as it will appear on the bottom of all the pages of the site.
The raw html for a server side include is:
This needs to be inserted within the body tags of the html. Basically to include any file you need to place the file location between the tags
Source: www.cosmicscripts.com
To insert a server side include, go to Insert => Script Object => Server Side Include. Here a window appears and you can select the file that you want to be inculded on all of your pages.
For example, this footer would be a common usage of server side includes as it will appear on the bottom of all the pages of the site.
The raw html for a server side include is:
This needs to be inserted within the body tags of the html. Basically to include any file you need to place the file location between the tags
Source: www.cosmicscripts.com
Insert Frames
Frames allow you to have multiple pages on one webpage. This means that you have various different elements of the page in separate areas, all which are controlled individually, usually by scroll bars.This feature allows you to easily have the same piece of information on all your pages of your website (for example the links column) without having to construct it various times. It also is a lot quicker when updating the site as you only have to change it once and it has changed on all the pages.In Dreamweaver, to insert frames, click on the Frames tab at the top of the page. This produces various options of frame positioning. The most common is to have a frame on the left side of the page (first blue/white button) or to have two frames, one at the top, one on the left (tenth button). Click on the desired button and a new column appears on the page. Here you can enter the text/graphics that you want in the frame.
Source: www.cosmicscripts.com
Source: www.cosmicscripts.com
Inserting Links
It is essential to link all your different pages together, with just a few clicks. As we have said before, it should take a visitor no more than three clicks to find what they want or they will probably give up and leave.
You can create links to and from different pages, or to other parts of the same page.
For example, a common useful link is to have a 'back to the top' link, to take the user to the top of the page they are currently on. To create such a link, type 'Back to the Top' and highlight the words. In the properties window at the bottom of the page, there is a box labeled link. In this box write where the link wants to link to. (In this case the top of the page) This would be ......
Links can be created between all the different pages of the website. To do this select the text that will act as the link and type in the box labeled link the name of the page which you want your visitors to see.
For example if you want to link to your contact page, type the link (e.g. contact us) and highlight the text. In the link box in the properties window, type the name of your contact page (i.e. the name which you saved the contact page as.)
This is a link to our contact us page. The words contact us were typed, highlighted and the location of the contact us page (contact.htm) was typed in the link box.
When a the text becomes a link it is coloured blue and is underlined.
The html for the above contact link is as follows:-
contact us
This basically says that the file name is contact.htm and the text displayed on the page is contact us. To produce other links, simply replace the file name and the text with the relevant information.
For example, a link to the home page would look like this:-
home
You can also link from website to website. To do this simply type in the text that you want to appear on your website, highlight it and in the link box in text properties window, type the URL of the website that you wish to link to.
For example this is a link to CosmicScripts.com
The html for the above link is as follows:-
CosmicScripts
To change the site to which the link relates, simply change the URL to whichever you choose and change the text on the site accordingly.
For example to link to AllAffiliatePro, the html would be:-
AllAffiliatePro
Source: www.cosmicscripts.com
You can create links to and from different pages, or to other parts of the same page.
For example, a common useful link is to have a 'back to the top' link, to take the user to the top of the page they are currently on. To create such a link, type 'Back to the Top' and highlight the words. In the properties window at the bottom of the page, there is a box labeled link. In this box write where the link wants to link to. (In this case the top of the page) This would be ......
Links can be created between all the different pages of the website. To do this select the text that will act as the link and type in the box labeled link the name of the page which you want your visitors to see.
For example if you want to link to your contact page, type the link (e.g. contact us) and highlight the text. In the link box in the properties window, type the name of your contact page (i.e. the name which you saved the contact page as.)
This is a link to our contact us page. The words contact us were typed, highlighted and the location of the contact us page (contact.htm) was typed in the link box.
When a the text becomes a link it is coloured blue and is underlined.
The html for the above contact link is as follows:-
contact us
This basically says that the file name is contact.htm and the text displayed on the page is contact us. To produce other links, simply replace the file name and the text with the relevant information.
For example, a link to the home page would look like this:-
home
You can also link from website to website. To do this simply type in the text that you want to appear on your website, highlight it and in the link box in text properties window, type the URL of the website that you wish to link to.
For example this is a link to CosmicScripts.com
The html for the above link is as follows:-
CosmicScripts
To change the site to which the link relates, simply change the URL to whichever you choose and change the text on the site accordingly.
For example to link to AllAffiliatePro, the html would be:-
AllAffiliatePro
Source: www.cosmicscripts.com
Inserting Images
Graphics enhance a webpage immensely. Without them the page looks boring, uninviting and your visitor is likely to leave. Luckily they are very simple to implement.
To add an image into your page using Dreamweaver, go to Insert => Image. A window will appear where you can select your image from your files. Select the image you want and click OK. The image will be inserted into your webpage wherever the cursor was at the time.
Clairebear
This image was inserted in that simple way. You can get images from almost anywhere (but remember to check for copywrite.) The internet is full of useful images available for use and with the use of a scanner, any real picture can be added to the site as well.The raw HTML of the image is:

Basically this is just the location of the image and its height and width. Simple!
Rollover Images
A common useful image is a rollover image. This is an image which changes in the browser when the curser is held over it. It consists of a primary image (the image seen when the page initially loads) and the secondary image (the image when the curser is over it). The two images need to be of the same size, although Dreamweaver will resize them if they are not.
To create a rollover image in Dreamweaver, Click on the Common option of the Insert window and click on the rollover image button (tenth from left). Click the curser where you want the rollover button to be and a window will appear. Insert an image name, the location of the primary image and the location of the secondary image. If the rollover image is also a link to another part of the site, add in the url as well. Click OK and your rollover image will have been created.
The rollover image uses two javascript functions which must be inserted inside the head tags at the top of the page .The functions below are provided by Macromedia. With these inserted you can have as many rollover images using the special a and img tags below.
This is the raw html for the rollover image above:

As you can see the raw html for rollovers is much more complicated than inserting them using a design package like Dreamweaver.
Source: www.cosmicscripts.com
To add an image into your page using Dreamweaver, go to Insert => Image. A window will appear where you can select your image from your files. Select the image you want and click OK. The image will be inserted into your webpage wherever the cursor was at the time.
Clairebear
This image was inserted in that simple way. You can get images from almost anywhere (but remember to check for copywrite.) The internet is full of useful images available for use and with the use of a scanner, any real picture can be added to the site as well.The raw HTML of the image is:
Basically this is just the location of the image and its height and width. Simple!
Rollover Images
A common useful image is a rollover image. This is an image which changes in the browser when the curser is held over it. It consists of a primary image (the image seen when the page initially loads) and the secondary image (the image when the curser is over it). The two images need to be of the same size, although Dreamweaver will resize them if they are not.
To create a rollover image in Dreamweaver, Click on the Common option of the Insert window and click on the rollover image button (tenth from left). Click the curser where you want the rollover button to be and a window will appear. Insert an image name, the location of the primary image and the location of the secondary image. If the rollover image is also a link to another part of the site, add in the url as well. Click OK and your rollover image will have been created.
The rollover image uses two javascript functions which must be inserted inside the head tags at the top of the page .The functions below are provided by Macromedia. With these inserted you can have as many rollover images using the special a and img tags below.
This is the raw html for the rollover image above:
As you can see the raw html for rollovers is much more complicated than inserting them using a design package like Dreamweaver.
Source: www.cosmicscripts.com
Head Content
A title for each page of the website needs to be entered so that search engines know what each page contains. The title is not displayed on the webpage. The title is entered by adding the required title between two title tags:
Webmaster Tools
Meta Tags
These are tags that contain information about the page which is used by web browsers and search engines. Words that relate to the page's content that you think that people will be searching should be entered. This helps to get ranked highly by the search engines. The meta tags for this page are:
Insert your own keywords that you think people will be searching for to look for your site. Tip: targeting less popular words and phrases will actually increase your
traffic. Microsoft do a program called Good Keywords. Download the software at :
http://www.goodkeywords.com
Insert a short description of your webpage. Tip: include as many keywords as reasonably possible.
This is another description of your website. Do not repeat what is said in the META NAME= "description" as the search engines do not favor this. Still try to include keywords.
This tells some search engines to follow the links on your page and index them into their search database.
Insert your own name or your company name. This is especially useful if you are a web designer so that people can see who made the site and perhaps pay you to design their site.
Here you can define the content of your site whether it is for viewing internationally, family orientated or adult. Options are:-
Global - Appropriate for web access.
Local - Web servers will not service a "local" document to the web.
IU - Internal use - Intranets.
This tells search engine spiders when to come back and re-index your page. Insert any time period you wish.
This tells the search engine what category to place your website into, depending on its content. Insert your own category. The options are limitless.
This tells people who has rights over the page. Insert your mane or the company name.
This is the ASCII character set and the content type. This should match the output of your server. Running the W3C html validator will tell you if you have input the correct character set.
This is the language your site is in. Such as EN for English.
Css Link
A Css link loads a file which contains the cascading styles for your site. This allows you to design the style for your site once. You can then add this at the top of each page. A Css link is very useful when updating your site as you only have to do it once and the whole site is updated. It is often used for font styles and link styles. To enter a Css link enter:
JavaScript Link
A javascript link is similar to a Css link and has the same advantages, you can update this and the whole site gets updated. To enter a javascript link enter:
Source: www.cosmicscripts.com
Meta Tags
These are tags that contain information about the page which is used by web browsers and search engines. Words that relate to the page's content that you think that people will be searching should be entered. This helps to get ranked highly by the search engines. The meta tags for this page are:
Insert your own keywords that you think people will be searching for to look for your site. Tip: targeting less popular words and phrases will actually increase your
traffic. Microsoft do a program called Good Keywords. Download the software at :
http://www.goodkeywords.com
Insert a short description of your webpage. Tip: include as many keywords as reasonably possible.
This is another description of your website. Do not repeat what is said in the META NAME= "description" as the search engines do not favor this. Still try to include keywords.
This tells some search engines to follow the links on your page and index them into their search database.
Insert your own name or your company name. This is especially useful if you are a web designer so that people can see who made the site and perhaps pay you to design their site.
Here you can define the content of your site whether it is for viewing internationally, family orientated or adult. Options are:-
Global - Appropriate for web access.
Local - Web servers will not service a "local" document to the web.
IU - Internal use - Intranets.
This tells search engine spiders when to come back and re-index your page. Insert any time period you wish.
This tells the search engine what category to place your website into, depending on its content. Insert your own category. The options are limitless.
This tells people who has rights over the page. Insert your mane or the company name.
This is the ASCII character set and the content type. This should match the output of your server. Running the W3C html validator will tell you if you have input the correct character set.
This is the language your site is in. Such as EN for English.
Css Link
A Css link loads a file which contains the cascading styles for your site. This allows you to design the style for your site once. You can then add this at the top of each page. A Css link is very useful when updating your site as you only have to do it once and the whole site is updated. It is often used for font styles and link styles. To enter a Css link enter:
JavaScript Link
A javascript link is similar to a Css link and has the same advantages, you can update this and the whole site gets updated. To enter a javascript link enter:
Source: www.cosmicscripts.com
Insert Tables
Without tables in your website, the text would run from margin to margin. A table allows you to put text wherever you like on your page. Tables are a very good way of displaying your information as they are easily modified and are compatible with most browsers. In Dreamweaver, to insert a table, click on Insert => Table and the Insert Table window will appear. You can select how many columns and rows you want. Select the width you want and choose whether the value is pixels or percentage. It is often a good idea to use percentage as no matter what size the browser window, the visitor will always be able to see all the information present. Set the border to however thick you would like it, by entering number (1 is the thinnest border). Click OK and the table like the one below will appear in your document. You can align the table either using the central, left or right align scroll bar at the bottom of the page in the properties tool bar, or by using the mouse.
If you are using raw html enter the following code to get the same table:
Tables can easily be modified once they are already in place.
In Dreamweaver:
To add in a new column, select one of the existing columns. Click on Modify => Table => Insert Column and click OK. The table now has an extra column. The same can be done to add a row (Click on Insert Row rather than Insert Column.)
To merge cells, select the cells you want to merge. Click on Modify => Table => Merge Cells. Click OK and the cells will merge. The same can be done to split a cell (Click on Split Cell instead of Merge Cells.)
You can change the width and height of the cells by moving the mouse over the border line you wish to change. The cursor will change to a border selector (Two parallel lines with outward pointing arrows.) Click and hold down the mouse button and drag the cursor to where you want the row or column resized to.
Colour can be added to the table. Highlight the cell(s) which you wish to colour. Click on the square to the right of the background colour (Bg Color) so that you can see the options. Click on the colour you want and it will appear in the selected cell(s).
A border colour can be added to the table. Highlight the whole table. Select a border colour (Border Color) by clicking on the square to thru right of the writing and selecting a colour.
Source: www.cosmicscripts.com
If you are using raw html enter the following code to get the same table:
Tables can easily be modified once they are already in place.
In Dreamweaver:
To add in a new column, select one of the existing columns. Click on Modify => Table => Insert Column and click OK. The table now has an extra column. The same can be done to add a row (Click on Insert Row rather than Insert Column.)
To merge cells, select the cells you want to merge. Click on Modify => Table => Merge Cells. Click OK and the cells will merge. The same can be done to split a cell (Click on Split Cell instead of Merge Cells.)
You can change the width and height of the cells by moving the mouse over the border line you wish to change. The cursor will change to a border selector (Two parallel lines with outward pointing arrows.) Click and hold down the mouse button and drag the cursor to where you want the row or column resized to.
Colour can be added to the table. Highlight the cell(s) which you wish to colour. Click on the square to the right of the background colour (Bg Color) so that you can see the options. Click on the colour you want and it will appear in the selected cell(s).
A border colour can be added to the table. Highlight the whole table. Select a border colour (Border Color) by clicking on the square to thru right of the writing and selecting a colour.
Source: www.cosmicscripts.com
Creating a Basic Page
Tags are html instructions that code for something. They are enclosed by < > and must always be opened and closed. A closing tag has a backslash infront of the instruction.
Anything between the two tags means that is is included in the table.
Basic Tag Set
If you are using Dreamweaver, when you select a new document, the basic tags automatically appear.
This tells the Internet what sort of page you have created and is needed for any page that is on the net. The title of the webpage is entered between the tags . The title will not appear on the site, but search engines use it to rank your site.
The content of the webpage is added between the and tags. (This is where the page is automatically entered if you are using dreamweaver.)
Background
The background colour is usually kept the same between each page of the website. To enter the background colour using Dreamweaver:
Go to Modify => Page Properties. This brings up the page properties window. In this window you can select a background colour by clicking on the square next to the word background. This brings up a square grid of colours you can choose from. Alternatively, you can click on the coloured circle just above these colours and choose a colour from the graduated selection. Click OK to apply this colour to your page.
If using raw html, add a background colour by inserting bgcolour= the required colour code within the body tag.
Source: www.cosmicscripts.com
Anything between the two tags means that is is included in the table.
Basic Tag Set
If you are using Dreamweaver, when you select a new document, the basic tags automatically appear.
This tells the Internet what sort of page you have created and is needed for any page that is on the net. The title of the webpage is entered between the tags . The title will not appear on the site, but search engines use it to rank your site.
The content of the webpage is added between the and tags. (This is where the page is automatically entered if you are using dreamweaver.)
Background
The background colour is usually kept the same between each page of the website. To enter the background colour using Dreamweaver:
Go to Modify => Page Properties. This brings up the page properties window. In this window you can select a background colour by clicking on the square next to the word background. This brings up a square grid of colours you can choose from. Alternatively, you can click on the coloured circle just above these colours and choose a colour from the graduated selection. Click OK to apply this colour to your page.
If using raw html, add a background colour by inserting bgcolour= the required colour code within the body tag.
Source: www.cosmicscripts.com
Insert a Text
Search engines rank a site on the content of the heading of a paragraph, rather than a body of text. Each section of your page should have a heading tag, and the main text a paragraph.
In Dreamweaver, to achieve a heading tag, highlight the text of the heading. Click the Format option in the Properties window (it is a good idea to keep the properties window expanded so that all options are exposed). Scroll to heading 1 and click. The same process applies for subsequent headings, with ascending numbers. Headings are always of default size.
To obtain paragraph tags, click the format option in the Properties window and scroll to paragraph and click.
This is heading 1
The heading has the tags
This is heading 2
The heading has the tags
This is heading 3
Heading 3 is surrounded by the tags
This is heading 4
Heading 4 is surrounded by the tags
This is heading 5
Heading 5 is surrounded by the tags
Please note that all headings are in default size. They get progressively smaller in size as they progress. The reason for this is that heading 1 is more important to your search engine rank than heading 5.
This is a paragraph. It is surrounded by the tags
Fonts
You can format your web page text however you like. There are numerous pre-installed fonts and others can be downloaded from the net.
To change the font, highlight it, click on the scroll bar next to the yellow A in the Properties window. Choose the font you want. To change the size, highlight the text and click on the Size in the Properties tool bar. Select whatever size you want.
Below, the tags found in the html surround the look and size of the font that they code for.
This is Arial, size 1.
This is Verdana, size 2.
This is Times New Roman, size 3.
This is Courier New, size 4.
This is Georgia, size 5.
This is Geneva, size none.
Please note that size none does not have any size reference in the html code at all.
To add colour to the text, highlight the text. Click on the square to the left of the size scroll bar. A range of colours will appear. Click on the desired colour and your text will become that colour.
This text is Verdana, size 2 and is blue
Source: www.cosmicscripts.com
In Dreamweaver, to achieve a heading tag, highlight the text of the heading. Click the Format option in the Properties window (it is a good idea to keep the properties window expanded so that all options are exposed). Scroll to heading 1 and click. The same process applies for subsequent headings, with ascending numbers. Headings are always of default size.
To obtain paragraph tags, click the format option in the Properties window and scroll to paragraph and click.
This is heading 1
The heading has the tags
surrounding it.
This is heading 2
The heading has the tags
surrounding it.
This is heading 3
Heading 3 is surrounded by the tags
This is heading 4
Heading 4 is surrounded by the tags
This is heading 5
Heading 5 is surrounded by the tags
Please note that all headings are in default size. They get progressively smaller in size as they progress. The reason for this is that heading 1 is more important to your search engine rank than heading 5.
This is a paragraph. It is surrounded by the tags
.
Fonts
You can format your web page text however you like. There are numerous pre-installed fonts and others can be downloaded from the net.
To change the font, highlight it, click on the scroll bar next to the yellow A in the Properties window. Choose the font you want. To change the size, highlight the text and click on the Size in the Properties tool bar. Select whatever size you want.
Below, the tags found in the html surround the look and size of the font that they code for.
This is Arial, size 1.
This is Verdana, size 2.
This is Times New Roman, size 3.
This is Courier New, size 4.
This is Georgia, size 5.
This is Geneva, size none.
Please note that size none does not have any size reference in the html code at all.
To add colour to the text, highlight the text. Click on the square to the left of the size scroll bar. A range of colours will appear. Click on the desired colour and your text will become that colour.
This text is Verdana, size 2 and is blue
Source: www.cosmicscripts.com
Langganan:
Postingan (Atom)